
Mass Effect Modding Tutorial: Editing Textures

Ok, so you know how to extract textures by now. Let’s talk about the second step, editing textures.
STEP 2. Edit the Texture Using Photoshop
… Or use whatever image editor you’re comfortable with. I won’t give a tutorial on how to use Photoshop because that would take forever. Instead, here’s just a general overview for the different types of files:
.TGA
If you followed my advice about extracting and saved your Texmod extracts as .TGA, this is pretty straightforward. Edit the file in photoshop and hit save. That’s it!
.DDS
If you extracted files manually, you’ll need to do a couple things:
- You need an image editor that supports .dds. Photoshop does NOT support it without the plug-in (download here).
- When you save your image as .dds, you’ll need to choose “Generate MIP Maps” and also choose what type of .dds format to use:
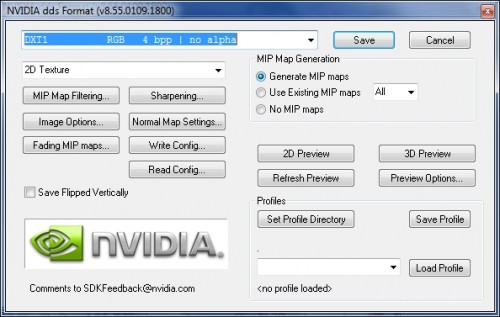
Here is the list of what formats to save as for armors/clothing:
Diff – DXT1 (no alpha) or DXT 5 (interpolated alpha) depending on the texture
Spec – DXT5 (interpolated alpha)
Norm – V8U8
Here is the list for hair/face textures:
Diff – DXT5 (interpolated alpha)
Norm – V8U8
*Note about Norm files in Photoshop – PHOTOSHOP CANNOT SAVE NORM FILES PROPERLY! You need to save the norm as .TGA and then import it into DirectX Texture tool and use that program to save it to .DDS format. Otherwise, you’ll get a really weird film over your texture that makes it look like it’s covered in dirty dishwater :)
Editing the Textures:
Disclaimer: This is just how I do things – it doesn’t mean there aren’t better ways or more efficient ones! I use Photoshop but if you use something like GIMP, here is a pretty good tutorial.
Diff – No special tricks for this in general. There are some things you should know if you’re making a custom skin texture, however. Read my separate tutorial for skin textures here.
Spec – The Spec is tricky sometimes. Depending on what you’re replacing, there could be a weird glow (ex: Defender Armor spec gives off an orange glow, Kaidan’s default armor gives off a blue sheen). You can fix this by editing the alpha channel and by coloring the spec to offset the glow. For example, if you’re replacing the Defender armor, the spec should be orange, like this:

For Spec files, just remember that the lighter the tone, the more light will reflect off it in-game. If you want no special reflection, make sure the alpha channel is black in the areas of interest. For example, Kaidan’s default blue armor has a blue sheen that will be on it regardless of the spec colors – the only way to get rid of it is to edit the alpha channel. Just color it in black!

Messing with the specs some trial and error, unless you’re replacing certain things without special specs (Shepard’s black dress is super easy to replace, and doesn’t require messing about with the spec – in fact, most casual outfits do no have special specs).
Norm – I usually don’t have to create a norm when replacing textures because I use the original norm or extract one from elsewhere in game. But, to create a norm, simply save your spec image as a V8U8 .dds file. If you’re using Photoshop like me, you’ll have to be aware that norm files are not saved correctly in Photoshop. You must do the following instead:
- Overlay the spec image with a Color layer of blue/purple – try color #5266ff. Save the spec image as a .TGA file.
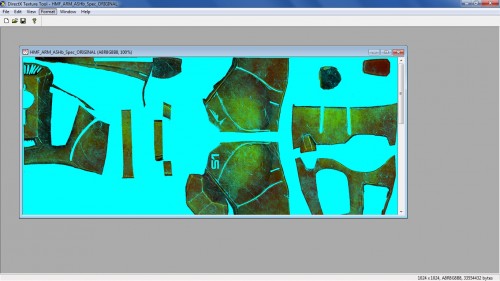
- Open DirectX Texture Tool and load the .TGA file. It will look something like this when you import it (but blue – sorry, my screenshot is weirdly colored):
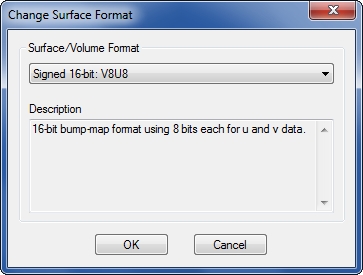
- Go to Format > Change Surface Format and select V8U8.
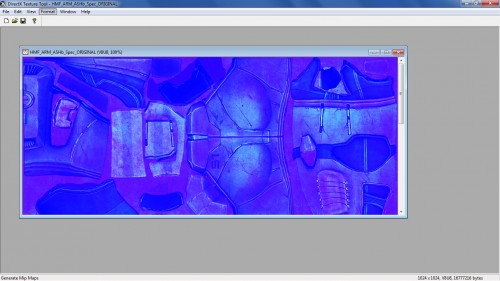
- Go to Format > Generate MIP maps. Oh, and your file at this point should look like this:
- Save as .dds! Your norm should be ready for upload!
Well, that’s the skinny on editing textures … ready for the next step, replacing the old texture with the new one? Read on!
Came here just for the extraction part, which wasn’t in the guide. Nice.